For my roommate Joe and good friend Steve's birthday, I made a tie-dye birthday cake! I had seen it on Pinterest and knew it was the perfect cake. (Credit to Bird On A Cake)
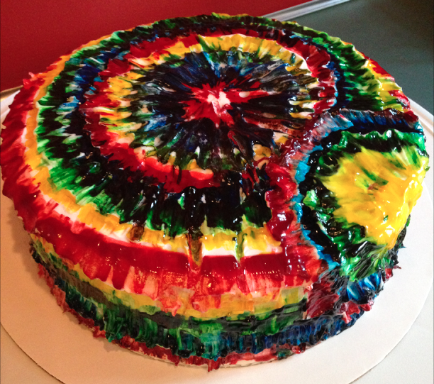
| First I started with two white cake mixes and a pack of four gel food colorings (red, yellow, green, and blue.) Make the cake mixes as normal in a big bowl. Then separate them into 6 different bowls (I used solo cups to minimize the cleaning) and designate a color to each cup (I mixed colors to make an orange and purple.) Then make sure the food color is at the desired hue. Then scoop the mix into 6 small piping bags (I used the small throw away ones by Wilton.) Next make sure your two 9" cake pans are properly prepared with either butter and flour or a cake spray (I like to use Baker's Joy with Flour.) Then using whatever design you'd like pipe the batter into the cake pans. I started with the red around the edges, then the orange next, and the yellow in the middle. Then on top I did purple on the edges, followed by blue, and green in the middle. Then I used a mini spatula to smooth out the top. Then into the oven it went. After eight I let it cool for about 20 minutes. Then I took my turntable out and a 10" cake board. Then I cut off the tops to make the cakes even. Next I took my white icing and put some on the first cake (just a thin layer to bond the two cakes) and then on top of the icing I put the second cake (flat side/bottom up so you get a nice and even top.) Now you can spread icing all all over the cake. Feel free to use whatever method you like but try to make it as smooth as possible. Then I let the icing set up for about 10 minutes. Next I got out my gel food colorings and two paint brushes (I bought them from Blick.) So you can start by making circles with your gel colors. I did red, blue, green, yellow, red, yellow, green, blue, etc. I suggest to also buy the neon colors from Betty Crocker if you want more a bright color variation. I figured since then was for two boys who were turning 25 they didn't need bright pink. Only do a few circles at a time because the gel can get solid pretty quickly. I recommend having a lot of paper towel and a cup of hot water. When you're ready to start, you can sweep the brush outwards toward the next color. Make sure to clean off your brush so the colors don't get too sloppy. Feel free to go off course like I did and make smaller circles. I thought my cake came out pretty good for my first tie-dye cake. Next time I think I would get an actual orange and purple gel food coloring. I started piping my gel circles a little too soon which made it harder to spread the gel. Also, vanilla on vanilla cakes are boring to me. Next time i'd like to flavor the cake. |      |

Tie-Dye Cake- 2 White Cake Mixes - Disposable Piping Bags - 2 - 9" Round Cake Pans | Tie-Dye Icing- White Icing - 1 Thin Paint Brush - 1 Half Inch Paint Brush - Small Cup of Warm Water |

 RSS Feed
